Add-Life : Mind & Body program helps Clinicians, Carers and Clients

Clinician Guide 2025

Hi, i'm Addy. We are so excited and proud to show you the "Mind & Body" system that showcases the effort and research that has gone into the platform.
Add-Life activities are designed to be fun and easy to use but also life-changing for both clinicians and clients.
You can be ready to work with a new client in 5 minutes and have a full mobility report in the under 20 minutes.
Setting up for a returning client can be done in seconds.
If you want to see how to use the headset itself, like connecting to WiFi, then please go to the "Start Here Guide", which explains the system in a non-clinical way.
Feel free to share this with your clients also.
The link to that is www.add-life.info/start-here
Download the PDF guide - Download the How it Works doc
User Roles
Admin

Has the ability to onboard new clinicians and see facility wide user reports.
Efficiency is paramount.
Clincian

Has the ability to onboard new users and see user reports as well as do live activities.
User

To enjoy physical and cognitive therapy through Virtual Reality. See their own progess in app.
Carer

Family, friend or non-clinical carer. There for support.
Can communicate with User and see reports in app


Step 1
Setup
1 Join Your organisation
1.1 Receive Invitation
Ask your admin to invite you. The invite email will go to the email used with a TEMPORARY PASSWORD.
Copy this password
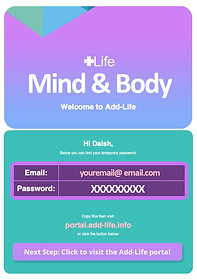
1.2 Use App or Web Portal
You can use the App or Web Portal
(both function the same)
Get the Apps on our App Page
or Log into https://portal.add-life.info


1.3 Create Password
Log in and paste the TEMPORARY PASSWORD and then make a NEW PASSWORD that only you know.
We suggest using a secure password generated by a password manager.

Step 2
Onboard
2 Onboard User
2.1 Onboard user
Onboarding is the term to create a new user Profile.
It takes only minutes but those decisions make a big difference in the long term. Thankfully, they can be updated in seconds later if need be.

2.2 Details and agreement
General details are important, and the email used will decide the user's login details. The user must also agree to use VR, and the checkboxes contain some contraindications that you should take into account when using VR.

2.3 Customisation
Adding the user to a specific group and shaping their experiences is next and will depend on various factors.
See below for more information

2.3 Deeper dive into customisation
2.3 Customisation
The location of the user, weekly goal and verbal goal can be added here which motivate the user in VR and allow easy understanding of the agreed realistic desired outcomes.

Choose Program is the main category choice of rehabilitation, aged care, behavioural, psychology and more.
The available categories have been pre-approved for this institute by the Admin

The choice here represents the modules that the user can access. Depending on your institute settings, you can alter these modules later.

Choose physical and Engagement goals for the user. You will see the graph change in the two graphs.
This important step changes the probability of a category of exercises to be part of their chosen daily circuit.

Step 3
Using VR
3 Using VR
3.1 Log user into headset
There are multiple ways to log a user into a headset. You can use an admin, clinician or user account.
You can generate a 4 digit pin by choosing "Users" and then "Login" Then click "Login with Code". The user then needs to input the 4-digits generated.
There is also a way to automatically log the user into a pre-registered headset


This is how it appears in VR
(see below)


3.3 Starting a circuit / assessment
Once Logged in the user can jump straight into a "circuit" which is a themed series of random exercises that match their requirements.
The menu will be different for each user based on which programs they are in. There will also be a "Mobility Assessment" Orb. All are activated by touching for 3 seconds., the user can jump straight into a "circuit", which is a set amount of random exercises.


3.1 Deeper dive into Logging a User In
3.1 Log user into headset
Select "Users"
Scroll to the correct user. Click them.
Now click "Login"

"Login with code" generates a code that needs to be manually entered by the user in the headset.
It is a good opportunity for a first engaging exercise with a new client - please make sure to read "Step 4 - Streaming" to aid in logging in


Close up:
If you can see registered headsets, it means your plan allows you to skip this step and log users in remotely.
Their serial number and status will appear here.

Step 4
Streaming
4 Streaming
What is Streaming ?
You will have heard the term "Streaming" in relation to Netflix or television. Simply put, it is a way to send an image from one place to another, and in our case, it means you can see through the user's eyes.
This makes guiding them a connecting shared and and so much easier experience.
On your phone/tablet you will see exactly what the user sees and can guide them, for example, in doing their own PIN login, which is a great test of cognitive and physical ability.

4.1 Download App
As the app cannot be used in a web browser, you must have either an apple or android version downloaded.
The Apple version can also be used on iPad and Macbook Pro (M1 or later) version.
Android versions can also stream to a TV through android link on some device.
You can also stream to multiple devices simultaneously.
Download links:


4.2 How to stream (all methods)
The top right section starts with 0 devices, and will automatically scan for devices running Add-Life software.

Note the app needs to be running (not paused) on the device. You should be able to hear the background music.

When found, you will see the number 1 then choose that device—the IP address (192.168.31.92 is an example and will be different each time usually. It will also try to remember the name of the most recent user ( eg Add-Life Demo User).
4.3 Streaming with Hotspot
4.3 Personal Hotspot
Good news: there is also another surefire method to connect to the phone, but requires a little pre-thought.
If you connect the VR device to the phone's "Personal Hotspot" feature, then it's a very secure and easy way to use streaming on the go.

What happens then is that the data from the headset is sent through the phones 5G channel and so also allows you to log in while in this mode.
Its a great solution for on the go streaming and login and avoids
Pro tip: to save battery life, your phone will turn off its hotspot when you don't use it, so you will need to turn it "off and on" again (yes, that old chestnut) to refresh it.
You can tell your phone to keep it on, but that will greatly reduce battery life. Please see your own phone settings to decide on a method that suits you.
4.4 Streaming with WiFi & IP
4.4 IP Address Method (WiFi)
A series of 4 numbers used to identify a device on a network. They are not relevant in any other way and they change often on public networks.
If auto-connect does not work, you can ask for the IP address from the user in the VR headset. Click the "IP" checkbox.
Then type it into the text field using the device keyboard. This technique is a great way when the connection is either too busy or just hard to connect.
This method is also for when your device and the headset are BOTH on the same WiFi network.
Pro tip: the two "lights" under the & symbol tells you that you are connected to the cloud (left) and connected to the streaming app (right) - you can also see a green light in the app when connected.


Step 5
Reports
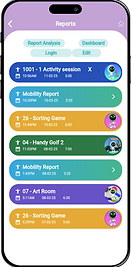
5 Reports (Mobility Assessment and more)
5.1 Making a report
The mobility report is one of the most important features as it is a tangible, and can be accessed at various stages of the circuits and menus
Some reporting happens automatically within a User circuit and you can also trigger one from the main menu.
To start a report, ask the user to touch the "Mobility Assessment" or trigger from the app (coming soon)

5.2 Understanding reports
The report s also emailed for your convenience so you can access it in multiple ways.
In the portal or the app the report looks like this , and you can scroll to see the data.
We can also export this as JSON or other data formats.
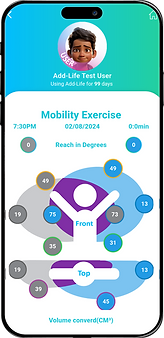
The App

User Info
Hand
Reach
DEGREES
Reach
Volume
Neck
Movement
Wrist
Reach
CM
Step 6
Menus & Settings
6 Menus & Setting (also 3.2)
6.1 Using the Menus
The menus all function in the same way. You put either hand inside the bubble for 3 seconds until the middle coloured section goes"pop".
They have sound and interactive sounds to help you understand that they are activated.
When in a sub-menu a "back" bubble appears to the left which goes up one level in the menu.


Back button
Logged In
6.2 Settings
The settings available to you depend on your account, group and physical/cognitive ability.
Add-Life prides itself on making accessible, usable, and intuitive interfaces and welcomes your feedback at any time.
We have language and will be adding many more customisations over time based on feedback.
To see how the settings of the actual device works - please see the "User Start Here Guide" here
Logged Out
Videos 1 - Using VR
Learn about the VR


Add-Life gives yo the flexibility to create your own circuit. Relaxation exercises calm down the brain allowing for greater neuroplasticity.
A range of exercises and relaxation activities await. Moving your body creates happiness and its easy to get 15 minutes of exercise done while having fun.
The ability to do a mobility assessment means you can store your session details
Add-Life Unique Touch Menu
To make our program accessible for those with hemiplegia and paralysis, or even cognitive difficulty, you can use either hand to activate a menu. The simple nature of it means its intuitive, fun and easy.
How to start an Activity
Using the same simple touch technique, you choose your activity and time. Now just.. enjoy!!
This can also be triggered from the Add-Life App
How to start a Relaxation Environment
As you guessed it. same simple techniuque, you choose your relaxation environment and time. Ommm!
This can also be triggered from the Add-Life App
How to start a Mobility Assessment
Sound familiar - touch the Mobility assessment button to begin your mobility assessment.
This can also be triggered from the Add-Life App
Videos about the VR for Clinicians
Add-Life gives you the flexibility to create the right pathway for each participant. Relaxation exercises calm down the brain, allowing for greater neuroplasticity.
Please note, as our software evolves, not all videos will be identical to the video. please contact us if there is any confusion.
A range of exercises and relaxation activities await.
The ability to capture a mobility assessment means you can store your session details, and have the best chance for successful diagnosis, analysis face-to-face or remotely.
Add-Life Unique Touch Menu
To make our program accessible for those with hemiplegia and paralysis, or even cognitive difficulty, users can use either hand to activate a menu. The simple nature of it means its intuitive, fun and easy.
How to start an Activity
Using the same simple touch technique, users can choose their activity oir citcuit (chosen by our specialised system for individual adjustment. Now watch them enjoy the magic!!
This can also be triggered from the Add-Life App (coming soon)
How to start a Relaxation Environment
As you guessed it. same simple technique, Choose their relaxation environment (or do a circuit). Ommm!
How to start a Mobility Assessment
Sound familiar - Ask the User to touch the Mobility assessment button to begin your mobility assessment. You will be able to trigger this from the app (coming soon).
Add-life will also have assessment only versions for return to work, permanent impairment, for non-rehabilitation environments.
Videos 2 -
Portal, App and Data
Learn about the Add-Life Portal & Mobility Data for Clinicians
We have designed a simple, scalable portal for you to use on phone, tablet or laptop.
You can see User details, onboard new Users, analyse information and more.
Using the portal or App
Admin, Clinician, User and Carer Logins mean everyone can access the correct data from the same place. This simple guide shows you how.
Understanding Mobility Data
Being able to get a snapshot of a client's mobility makes it easier to understand the fastest way they recover, and an easy way to remember their status if you have not seen them recently.
You can make decisions easier when you can refer to real data and bring it into an individual or their primary carers understanding.